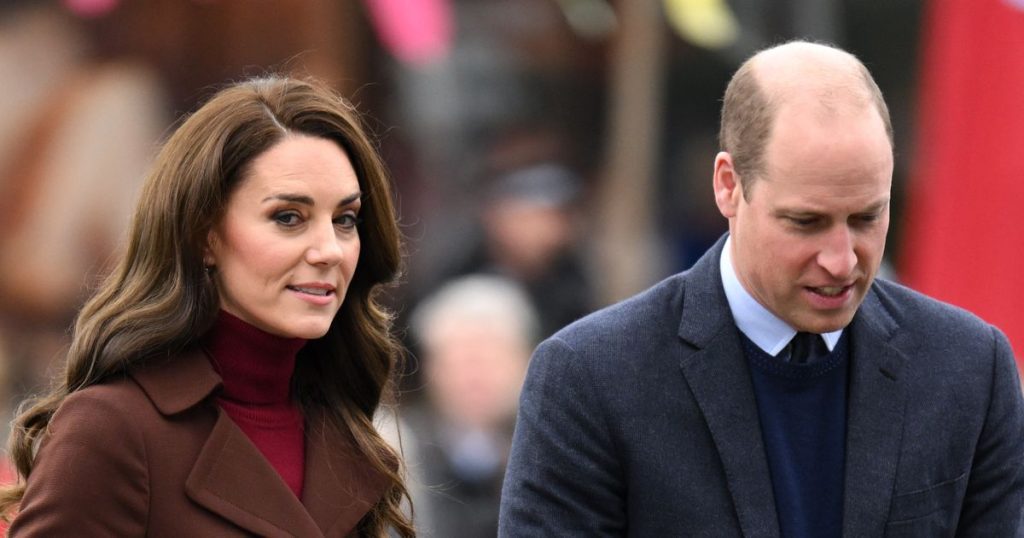
Email filters exist and are available in all good e-mail services, even free ones, but despite this, many users are unaware of their existence, or when they know or do not know how to use them and for everything they serve and what they can do for them.
Properly created and configured, they are a powerful and efficient tool for managing an email account.
)For this reason, in our chat today, we are going to explain what they are, in what situations they can be useful and how to create useful filters in the management of e-mail.
What is email filter?
As the name suggests, an email filter is a feature that performs the selection according to certain criteria of what passes or does not pass to the inbox of the e-mail account, as well as a set of actions on its content.
Whoever knows e-mail filters, often associates them with SPAM control and in fact, it is the use most common known es.
But it is not only for this purpose that they are used.
In the same way it is possible to define what is done with a message that constitutes junk mail , you can determine different actions for messages that have different characteristics, in terms of sender, subject, message body, header and even error messages.
Importance of the filter e-mail
E-mail is still the most important and most used service by people and companies and therefore having resources beyond the simple sending, receiving and reading, it’s crucial.
When you see what you can do using the most sophisticated and complete email filters, or even some simpler ones, the job of organizing incoming messages is very easy. In fact, it can be almost completely automated.
Suppose your professional email account is used to communicate with numerous suppliers, partners and other types of business contacts, which is quite common. depending on the business and its size.
Finding messages from any one of them among all the others, inside an inbox, can be a very time-consuming task, especially those that have common with all incoming messages.
Can you sort them manually by selecting, dragging and dropping them directly into the folders created for each contact? Yes you can. But how much time do you spend doing this every day?
The amount of time can be significant in many areas of a business. Not to mention mistakes that can be made in this task.
With e-mail filters properly created and configured, each message received automatically will be allocated according to the criteria you define, in such a way that if you receive XPTO company’s budgets and reports, the messages are automatically stored in the respective budgets and reports subfolders of the XPTO folder.
Comfortable and practical, isn’t it?!
Thus, a good and well thought out set of email filters contributes to:
- Organization – messages are separated into different folders, according to your needs and desires;
- Time saving – avoids having to manually “archive” messages by criteria such as sender and subject, saving valuable time;
- Productivity – in tasks that require the use of information that needs to be retrieved or consulted, it is faster find what you are looking for, contributing to productivity;
- Security – in addition to the information being stored more appropriately, the filter is not “tricked” by some email spoofing techniques, which is when one sender impersonates another. It’s safer too, because you’re more unlikely to delete it by mistake, a situation that can be common when all messages from different senders are mixed up with each other in one inbox;
- Administration – managing the account so that it doesn’t take up too much disk space, whether on hosting or on the device, is also more practical;
- Better control of junk mail – any SPAM that is not detected and filtered is more easily localized because there will be fewer messages in the inbox;
- Automation – particularly in the case of the dashboard of cPanel control, among the available actions, there is the possibility of forwarding a message to a program and, therefore, suppose that you have some system that is fed with information received by e-mail, you can program such forwarding without having to to carry out the process manually and;
- Control – another convenience for those who use cPanel, is the possibility of using expressions regular, which makes filtering more powerful, refined and intelligent and which, combined with the evaluation of numbers, allows you to create control features for numerous situations. Suppose you receive a lot of data, but on the condition that some values occur, certain people in the company need to receive an SMS (automation), this is possible;
- Personalization – even for cPanel users, it is possible to create filters by users and global filters, that is, for each email account and for all domain accounts, in such a way that it is possible to have different levels of customization.
How to create email filters in cPanel?
As we said, filters are available on most good email services. Not all have it or offer it to their users. And even those that do, may present particularities of use and different ways of creation / configuration.
For this reason, we will dedicate ourselves to creating / configuring email filters from the cPanel control panel, which is what host server users have at their disposal.
Another important observation is that we will only indicate the main steps for creating a filter, since issues such as the use of regular expressions and automation, by themselves, they are much broader issues that produce several developments.
1. Creating folders
Before creating any filter, the first step is to create the folders to which messages should be sent in the respective e-mail accounts.
This action is necessary, because as soon as each rule / filter is created, it immediately starts to work and, therefore, if any message meets the criteria contained in the filter, the corresponding action is performed.
The structure of folders in an email account is similar to what you have for directories in your operating system. Therefore, you can have a supplier directory and within it, directories for each type of input / service (eg: raw materials, services, outsourced, etc) and in turn, folders with the names of the respective companies.
Thinking about this structure will help you in the future whenever you have to consult and locate a message.
2. Access the Control Panel (cPanel)
It is in the control panel (cPanel) that you create, change or remove any filters that may exist.
The cPanel email filter icons are grouped under the E-Mail item of the panel and appear under the names of “Global Email Filters” and “Email Filters”.
Global filters are those whose rules apply to all accounts in the domain and therefore require more care in their creation / configuration.
Because they affect all accounts, we recommend this option only for users advanced and who are familiar with how the feature works.
3. Email Filters
As we mentioned, the best thing for beginners is to create filters for specific and not global accounts. Therefore, when clicking on the option “E-mail filters”, a page will be displayed with the list of accounts created under the domain and next to the link “manage filters”.
On the next page , click on the “Create a new filter” button.
By doing so, a series of options will be displayed, as follows:
- Filter name – this is the name you will give to the filter, noting that the more filters you create, in the future a suggestive and explanatory name will help to locate it if necessary change it, consult it or even remove it;
- Rules – this is the part related to the filtering itself and which involves the conditions that must be verified;
- Actions – when the rules are met, a corresponding action is performed, such as sending to a specific folder;
- Create – the create button must be clicked when the previous fields have been properly filled or selected and verified for accuracy.
4. Understanding a basic filter
The most important part of any email filter are the rules. Understanding what they are and how they work depends only on a little logic and the basic elements that make up an email message.
You must choose some part of the message and a condition so that once it occurs – or not – an action is then triggered.
Typically every message has:
- Sender – and that in the select field of the rules corresponds to “From”. It is the email address “From” you received the email;
- Subject – is equivalent to the value “Subject” in the first select field. When you want to use some content present in the subject of messages, it is this value that must be selected;
- Recipient – corresponds to the address of the recipient and the value “To”, but which, in addition to your own e-mail, may contain others, when a message is sent to more than one recipient;
- Any recipient – equivalent to the above and used in messages with two or more recipients;
- Reply to – also known as reply-to and which here appears with the value “Reply”, is the address field electronic response, generally used in e-mail Marketing services, when the account to receive interactions is not the same as the one that makes the submissions;
- Message body – the message body, which has the value “Body”, consists of the message itself;
- Email header – header of a message in e-mail, it is the set of information that the e-mail service uses to identify each message and that contains all of the above information, as well as others. In the rules, it appears under the value “Any header”;
- Error message – messages that you sent and could not be delivered, they return as error messages to your inbox and to the rules, they must have the value “It’s an error message”;
- ID – every email service assigns a unique ID (identifier) to each message. The value of this for a filter appears as “List ID”;
- SPAM – messages that were filtered for possible SPAM, which in the case of cPanel is done by the SpamAssassin tool, has a “Spam Status” (yes / no), has a “Spam Bar” (“+” to “++++++ +++”) and “Spam score” (0.0 to 10.0).
That is, any of these aspects above can be chosen for evaluation.
And how or what is evaluated?
In the field to the side, there are the options regarding the evaluation:
- Contains – means that every message that contains a certain word in the field ” From” (sender), shall be subject to action. If, for example, you fill in the third field (below) with “with”, messages whose senders are addresses like “comunicacao@xpto.net.br”, “vendas@compreagora.org” , “suporte@xpto.com.br” and “blog@xpto.with”, will be processed according to the chosen action, as they all contain the string “with”;
- Regex Matches – refers to using regular expressions to be checked and as we advance, we will not cover it here;
- Does not contain – it is the inverse of the first one, that is, for the 4 addresses that we used as an example, there will be no processing. However, if you instead receive a message from “vendas@xpto.net.br”, it will be subject to the rule;
- Equals to – this condition should be interpreted as “is equal to” and which in practice means that the whole word and not just any part of it must be equal or identical. If you fill in the third field with “apple@apple.com”, only those who use that exact sender will have their message processed. The message “apple@app1e.com”, will not be, because if you notice, we replace the “l” of the domain by the number “1”, which are similar and can deceive the most inattentive. This is even one of the email spoofing “techniques”;
- Starts with – use this condition when you want only messages that start with a certain string to be processed, which in the case of the first example would only affect “comunicacao@xpto.net.br”, but would leave out the other 3;
- Ends with – analogous to above, but considering the correspondence of the string at the end of the email address, in this case, only the fourth address would be processed (blog@xpto. with);
- Does not start with – it is the inverse of “begins with” and for that reason I would leave out “com unicacao@xpto.net.br”, but the other 3 would be processed;
- Does not end with – it is the inverse of “ends with” and therefore, the message coming from blog@xpto would not be subjected to any action.with, but the other 3, yes;
- Does not correspond to – this condition is the opposite of “equals to”, or in other words, is the same as is different from. In this case, an attempt to cheat using a domain that looks like “apple.com”, but actually uses the “1” in place of the “l”, would be prosecuted. In fact, everything that is not exactly the same, will suffer the chosen action;
- It is above – should be used as a condition only when the chosen field is exclusively numeral and, as it suggests, when the number is above the value you determine;
- Not above – it is the inverse of the previous one and also only applicable in fields with numeric values only. If you determined, for example, the value 100, everything below 100 and the number 100 itself will be processed;
- It is below – it would look like the condition immediately above, however, for the given example, messages that eventually contain 100, will not be processed;
- Not below – it is the inverse of the previous one and like the three above, it is exclusive to numeric fields only.
The option in addition to the rules is located further to the right and refers to the “AND” and “OR” operators .
You can combine two or more rules by clicking on the “+” button that will allow you to define a second, third or nth rule and choose if they combine.
Let’s say that one condition is not enough for a message to be relocated to a certain folder, but that two need to be checked. In this case, the “AND” operator is used, indicating that both need to be satisfied.
But if only one of two or more is enough, select the “OR” operator, indicating that only one or just the other are enough to trigger the action.
5. Choosing the action
For the purposes of what we exemplified so far, the most common thing is to determine a folder to which the message will be moved and for that, you select the option “Deliver to folder ”. Below will appear the button to “search” and that, once clicked, will display the tree of folders that you have created in the respective e-mail account.
But there are other options besides this one:
Discard message – this action causes the message to be sent to the trash;
- Redirect to e-mail – in the field below, enter an e-mail account to which you want it to be sent. It works as an e-mail redirection;
- Message failed – it will appear as an error message for the sender;
- Stop processing rules – this action is used when you want to stop processing previously configured, but you do not want to delete the created filter;
- Redirect to a program – no field available below, you must inform the path where the program that will process the message is located, emphasizing that it must be in the hosting account.
By clicking on the “Create” button, if there is no error – usually in the information supply fields – the message will be displayed that the filter was created successfully and it will be listed by the name that was provided, on the filters homepage, where you previously clicked on the “Create a new filter” button.
Conclusion
Email filters are powerful tools ents that serve to organize and improve productivity, to control and even to secure an e-mail account.